Pages

Search This Blog

Showing posts with label acoustics. Show all posts

10.02.2012

Featured Equipment: Primacoustic London 8 acoustic treatment kit

Primacoustic London 8 acoustic treatment kit
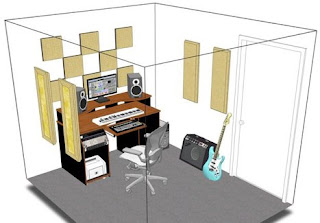
The Primacoustic London 8 is the perfect ‘studio in a box’ for those that have small rooms but plan on growing! It features a selection of 14 high performance Broadway panels for optimal sound absorption and maximum control.
Find out all the details: Primacoustic London 8


TOP FEATURES
  • Complete recording studio in a box
  • Live-end, dead-end (LEDE) room design
  • High performance fabric covered acoustic panels
  • Includes easy-mount hardware and screws

Find out more and buy Primacoustic London 8 acoustic treatment kit at Revolution Audio

1.24.2012

Featured Equipment Of The Week: Primacoustic London 10

Primacoustic London 10 Acoustic Treatment Kit
Primacoustic room kits have been carefully designed to address primary acoustical concerns that are common to all rooms by combining various components such as wall panels, bass traps, diffusion and hardware into an easy to use format.
The Primacoustic London 10 is the ideal acoustic studio package for office & bedroom sized facilities. It features 20 high performance high density Broadway panels for even sound absorption in the critical listening range.
Find out more - Primacoustic London 10 room kit


  • Complete recording studio in a box
  • Live-end, dead-end (LEDE) room design
  • High performance fabric covered acoustic panels
  • Includes easy-mount hardware and screws
Find out more and buy Primacoustic London 10 room kit

12.05.2011

Featured Equipment Of The Week: KRK ERGO System

KRK ERGO System
Room correction system and professional quality monitor controller.

A great mix starts with a great recording room. But when it comes to achieving the most accurate mix, your room may have the upper hand. Like any room, your studio's acoustics include offending frequencies and room reflections, and none of these are helping your mix. Getting a handle on these problems has traditionally meant the installation of soft foam or fabrics, and that's a great start. But now you can get even closer to a perfect room, and a perfect mix, because the future of studio sound is here, and it's called ERGO.
Read all the details: KRK ERGO Monitor controller and Room correction system


TOP FEATURES
  • Large Volume Knob: Digitally controlled analog volume control simultaneous control of ERGO's A/B/Sub outputs.
  • "A" Speakers: Enables or disables the audio being sent to the "A" speakers.
  • "B" speakers: Enables or disables the audio being sent to the "B" or subwoofer speakers.
  • Focus / Global / Bypass: Our 3D model allows users to preserve the "good" features of the room, while correcting the bad. ERGO also doesn't color the sound or produce an artificial anechoic environment. Normally, ERGO corrects for your monitoring position. This gives you perfectly corrected sound while mixing. In Global mode, the correct spot is widened so that others (producers, musicians, A&R) can enjoy your mix in a corrected environment.
  • Headphone Volume (side panel): Adjusts the output level of the headphone jack. The headphones output mirrors the selected monitor outputs.
  • Calibration Switch (back panel): This enables the room calibration microphone and places ERGO into analysis mode.
Buy KRK ERGO in the Revolution Audio online store

11.28.2011

Featured Equipment Of The Week: Primacoustic Stratus Acoustic Cloud

Primacoustic Stratus Acoustic Cloud
The Primacoustic Stratus is an acoustical device that suspends above the recording console to control early reflections, flutter echo and help eliminate standing waves that cause resonant peaks in the critical mix position. Once in place, you will immediately enjoy a more controlled and intimate acoustic environment, larger sweet spot and reduced ear fatigue.
Find out more | Primacoustic Stratus Acoustic Cloud $199
TOP FEATURES
  • Suspends over the console or listening position
  • Attractive fabric wrapped glass wool panel
  • Easy to assemble suspension hardware
  • Eliminates floor to ceiling reflections
Buy Primacoustic Stratus Acoustic Cloud at Revolution Audio

8.15.2011

Fixing Small Studio Acoustics Problems

This weekend I moved my home studio from one room to another. From a nearly 200 square foot living room to a 100 square foot bedroom. It's been a long time since I've thought about room acoustics and because this is a common situation for home studios, I thought I'd share my experience.
This article will help you understand and overcome the challenges of a dedicated studio in a small room. It will be most helpful to those with symmetrical rooms (no weird angles) and to those that don't need all the usual bedroom stuff, at the very least it will be a starting point to making the best of the situation.

Corner bass trap and broadband absorbers plus foam above.
 The Problems
Small rooms are more likely to have acoustic problems than larger ones, primarily flutter echo, room modes and early reflections that are too short. In my room, I knew there was a very bad flutter echo problem and room modes may be a problem but were predictable. The room is symmetrical also which was an advantage the old room didn't have. The measurements are approximately 11ft long x 9ft wide x 8ft tall. There is a door and a closed on the back wall and 6 x 4 window on the front wall.

7.04.2011

Featured Equipment Of The Week - Primacoustic London 8

Primacoustic London 8 Complete Acoustic Treatment Kit
Primacoustic room kits have been carefully designed to address primary acoustical concerns that are common to all rooms by combining various components such as wall panels, bass traps, diffusion and hardware into an easy to use format.
Find out more


The Primacoustic London 8 is the perfect ‘studio in a box’ for those that have small rooms but plan on growing! It features a selection of 14 high performance Broadway panels for optimal sound absorption and maximum control.

The London 8 presents an ideal solution for smaller post production suites, gaming effects, voice over and home studios. 

  • Complete recording studio in a box
  • Live-end, dead-end (LEDE) room design
  • High performance fabric covered acoustic panels
  • Includes easy-mount hardware and screws

Buy Primacoustic London 8 Complete Acoustic Treatment Kit

6.16.2011

Primacoustic Announce New London 16 Room Treatment Kit

Great news from Primacoustic, a new room treatment kit for home/project studios. The London 16 (along with London 8; 10; and 12 kits) will be available for purchase from Revolution Audio soon.


Primacoustic continues its dedication to taking the mystery out of acoustically treating rooms with the introduction of the London 16™ room kit, an all in one ‘studio in a box' that can turn any room into a functional work space.
Designed for larger rooms, the London 16™ is assembled from 38 high-performance Broadway panels. These provide even absorption throughout the audio range to ensure mixes translate better from room to room or when listening in the car. Broadway panels are also class-1 fire rated for safe use in residential and commercial buildings.

According to Primacoustic Product Specialist Jay Porter: “The London 16™ was developed with professional control rooms, studios and post production facilities in mind, but will work in practically any room where the acoustics need to be brought under control.” 


The London 16™ comes complete with twelve 12”x48”x2” Control Columns to control primary reflections and six 24”x48”x2” Broadband Absorbers for low frequency bass control, plus twenty-four 12”x12”x1” Scatter Blocks that work double duty by introducing soft diffusion while also reducing flutter echo. Each kit includes Surface Impalers, screws, and wall anchors for easy installation. No messy glue required! 42 panels. Ships in 4 boxes. Choice of black, grey, or beige fabric.

Primacoustic…Take control of your room

3.15.2007

How to Build a Floating Room for your Home Recording Studio Part 3 : The Weakest Links - Windows and Doors

by Jason Johnston
A few months ago we looked at various aspects of the physical construction of a home studio including how to build a floating floor and walls / ceilings. There are a couple of weak links in any studio construction. Windows, Doors and Ventilation are the key problems. This month we will look briefly at Window and door construction for the home recording studio.

Doors - Hard to have Room Without them!
Recording rooms would be so much more sound proof if we didn't need a way to get people into them! Maybe there is a way we could build the room around the artist and then feed them through tubes in the wall.... Short of that, recording rooms need doors and these seemingly small details tend to ruin an otherwise quiet room.
The one main problem is that you cannot completely seal off doors from any cracks that would allow air, and subsequently audio waves, to seep through. But you can prevent this as much as possible. One quick and easy solution is to purchase pre-hung, exterior doors instead of interior doors to use for your studio. These are made to stop outside drafts from coming inside, and will help you in the same way for your studio. The prehung doors come complete on the frame with seals, frame and threshold. The overhang between the door and frame helps with the STC rating and then the weather stripping helps to achieve air tightness.
The second problem with doors is the construction of the doors themselves. As we discussed before, more mass is typically better for sound attenuation. Layers are typically better. Decoupling is always better. The typical construction grade interior door is hollow and made out of some sort of light, pressed wood product.
One final note on doors: Typically wider is better, not from a sonic standpoint, but from a "how the heck are we going to get that piano in there" standpoint.

Windows - Line of sight, not just sound
So you have built your air tight studio with a zillion layers to your walls, and all the right materials: Now cut big gaping holes in them for windows! That is the cruel joke of building an isolation room. But they are necessary (although I have seen a couple of interesting designs using closed circuit cameras that are interesting). First let's talk materials:
- Plexiglass - scratches too easily, you want to be able to see inside after a couple of years....
- Float glass - can be up to 1 inch in thickness - readily available and can be cut on site at most local glass places but not as effective in isolation as other types
- Heat Strengthen or Tempered glass - often found in sliding doors for it's durability, but cannot be cut once it is made - better isolation than float glass
- Laminate Glass - Made with an inner plastic layer (the laminate) between two pieces of glass which significantly reduces sound transmission - lab test have shown this to be the best glass for sound isolation

Before this article turns into a book, I will get to the point. A typical studio will use two of these pieces of glass, suspended each in their own frames, without touch one another. Creating an air tight frame is important. The more density and stiffness to the glass, the more it will be like an extension of the wall and create good isolation. In my study, angling one piece of glass may help reduce the sound transmission between having parallel pieces on one hand, but may actually increase sound transmission by decreasing the air spring between the pieces of glass. Before going out and having glass cut, which can get quite expensive, consider these options:
1. Sliding doors between the studios: If they are made with tempered glass and you double the doors up, this might double as an entrance as well a line of sight - better than cutting an extra whole in your airtight room since you will need a door anyway
2. Double pre-framed exterior windows. I was trying to finish my studio within a reasonable budget and so I found six foot long exterior house windows that were being recycled. They used laminate glass have seemed to do the trick. See the picture below. We framed each window into each wall and used black material between them to keep the dust out and give it a nice finish. You'll want to make sure the inside windows are very clean before installing them! A friend told me about a studio that had a fly sitting dead between the panes of glass...I won't tell you the new nick name for the studio.


Conclusion: Hopefully that helped as a quick overview. Do your best. You can always do more, but don't let the size of this project keep you from doing at least SOMETHING!

10.02.2006

How to Build a Floating Room for your Home Recording Studio Part 2 : the Sound Proof Walls

Part 2 : the Sound Proof Walls
This series of articles is more of a picture book of the floating room that we built for the live room of the studio here at Revolution Audio in Mississauga, Ontario, Canada. (Caution this may take a few moments to load all the pictures)
Now we come to adding the walls onto our floating floor. Notice the final layer of the floor (the manufactured hardwood) will be completed after the walls are finished and painted. For the walls, I was shooting for an STC rating of around 62 which would allow me to record drums in the room without disturbing the neighboring businesses. So I decided upon a double steel studded wall assembly with double drywall on the inside.


For the STC ratings of various wall assemblies, this is a great website and resource: www.STCRatings.com

Of course, there is no such thing as a true sound proof wall. The proper term is "sound isolation." So you need to decided from from the front end how isolated you want your room to be. The three keys to isolation are three "d's" : density, distance and decoupling. We add density through the double drywall layers (5/8 inch in this case) and the safe n' sound insulation. We add distance between the inside and outside walls creating at least a 9 inch air gap. (We would actually decrease the STC rating by adding drywall in the middle of this assembly). By using double steel studs and resilient channels we decouple the walls from one another so that the sound has a harder time vibrating through to the opposing room.
You will see through the pictorial below that we built the inside walls on top of the floating floor, giving one more step in isolation from the outside wall. The ceiling then was built upon the interior walls, basically creating a floating room.

IMG_0035.JPG
Ewen is seen here constructing the frame for the interior walls and ceiling.
framefloorfull
Notice how the frame is built on the floating floor.
IMG_0040.JPG
The interior ceiling will rest on the top of the walls and have no solid connection to the ceiling above. This is key for decoupling. You will have to consider the weight of the ceiling material to make sure it will hold!
IMG_0039.JPG
The slant on the ceiling frame is intentional...really!
IMG_0042.JPG
We installed this temporary bar in to keep the whole room from leaning before we could get the drywall on.
IMG_0043.JPG
Here is the finished frame with safe n' sound insulation and the resilient channels on the ceiling.
IMG_0044.JPG
Jak installing more resilient channels. Every bit helps with soundproofing.
IMG_0048.JPG
Jak mudding the first layer of drywall. Attention to detail is important.
IMG_0002.JPG
Here you can see the second layer of drywall being placed on the ceiling. It is important to stagger the seams. The drywall lift was well worth the rental price.
IMG_0011.JPG
Some people use different thicknesses of drywall. We used 5/8 fire code on both layers to add more density.
IMG_0014.JPG
Here is a half-depth wiring box so that both layers of drywall are not penetrated.
IMG_0004.JPG

It's always nice to have good friends like Mark here! (if you are looking for a car - he's the guy www.carsense.to )
IMG_0008.JPG
Using flexible Alex Plus caulk to seal between the drywall and the floor. A small gap should be left when putting in the drywall to allow for this.
IMG_0006.JPG

A finished corner! (More about doors and windows in the next article)

IMG_0010.JPG
Harmony Three-in-one underlayment for laminate and engineered wood flooring. They say it has an STC of 59! I doubt it's that high, but I can see how the design would help decoupling.
IMG_0012.JPG
The engineered hardwood floor installed. I used engineered hardwood because it has some good density and does not need to be nailed down.
IMG_0014.JPG
The corner after the floor.
IMG_0007.JPG

What will be the vocal/iso booth after the trim and window was installed.
Hope you enjoyed the pictures and article! If you would like more information, please contact us about consulting with you on building your own home recording studio!

9.12.2006

How to Build a Floating Room for your Home Recording Studio Part 1 : the Magical Floating Floor

Part 1: the Magical Floating Floor


It all sounds very mystical - a room and floor magically floating, isolated away from any contact from the outside world. I kept thinking about Magneto's prison in X-Men. This article is more of a picture book of the floating floor that we built in my the live room of the studio here at Revolution Audio Recording in Mississauga, Ontario, Canada.

There are many ways to build a floating floor. I went to some extremes, but large budget studios would go much further than I did. I would consider this a mid-cost, home recording studio floating floor, suitable to put on any level of a house or commercial building with a little bit of headroom. The floating floor (only - not the hardwood on top) cost me around $800 CAD for 160 SF, or about $5 sf + labour. A bigger budget floating floor might cost 10 times as much or more and include hundreds of pounds of cement and high gauge metal springs - this floors are amazing, but are not for the typical home recording studio (or typical house construction!). Why a floating floor, you might ask? The main purpose is to create a room which is isolated from the rest of the building/environment around it.

Isolation, and specifically the method of "decoupling," is the key to reducing the sound levels traveling into and out of a room. Notice that I didn't say "sound proof" a room. There really is no such thing. In building a room, however, you can determine what the loudest sound will be in the room and then respond accordingly as it fits into your budget and space constraints. I determined that I wanted a live room that I could record drums in any time of the day or night without disturbing my neighbours to the left and right (a Hearing specialist on one side, oddly enough) and the other people living about the stores in the building. I determined that I was looking to build a room with an STC rating (sound transmission class) of around 62 to bring the drum level down to a reasonable level.

To achieve a target STC of 62 I had to plan and build to some considerable length, the details of which I may get to in a later article, but which included the purpose of this article: A room floating inside a room - basically an exterior shell, secured to the rest of the building and a room built inside upon a floating floor, none of which is secured to the building - the only real contact points being the floating floor. Below is the picture book showing the details of the first step, the floating floor.
Stay tuned for further articles on such fun subjects as soundproofing (so called), double walls, make-shift iso vocal booths and sound treatment vs. sound isolation in the studio.

IMG_0004.JPG
The pre-existing floor looking towards the back room
IMG_0010.JPG
The neoprene pad comes in a 2 X 2 foot size which we must cut down to 2 X 2 inches. This one is weighted for up to 25 psi
IMG_0013.JPG
These straight edged tin snips are handy...
IMG_0016.JPG
Cutting the squares
IMG_0015.JPG
The two inch neoprene square.
IMG_0014.JPG
First using the paint thinner to clean each 2 X 2 pad, we then use the contact cement to glue them together 3 at a time.
IMG_0017.JPG
This part reminded me of a good old craft time
IMG_0019.JPG
The finished neoprene sandwiches (or pucks as I'll call them)
IMG_0020.JPG
The pucks are scattered on the floor. We figured out the weight distribution and to weigh each puck down about 15 lbs. for maximum elasticity, we used 76 pucks.
IMG_0021.JPG
Ewen (with no head) and the pucks
IMG_0022.JPG
We decided to put half thickness of safe n' sound insulation around the pucks to avoid any hollow sound to the floor. Ewen is using an exacto knife to cut them in - we don't want the floor resting on the insulation, or anything else except the pucks.
IMG_0024.JPG
Side view of layer # 1 going down.
IMG_0025.JPG
Layer #1: Tongue and Groove Plywood/ OSB resting on the pucks (not secured down, only resting on top)
IMG_0026.JPG
Layer #1 finished
IMG_0027.JPG
Putting down layer #2: 5/8 firecode drywall
IMG_0028.JPG
Layer #2 finished - we put a few screws in to help secure the tongue and groove floor beneath it.
IMG_0029.JPG
We built a box around the floor vent to allow the floor to float around it rather than resting on it. IMG_0030.JPG
Layer #3 - another plywood tongue and groove (OSB)
IMG_0031.JPG
Ewen putting in the final underfloor piece. My final hardwood floor with underpadding will lay onto this floating floor (pictures to come...)
IMG_0032.JPG
Side view of the new floating floor - from the bottom there is the puck surrounded by insulation, then T & G plywood, then 5/8 drywall then another layer of T & G