Pages

Search This Blog

Showing posts with label guitar. Show all posts

11.02.2012

Mixing Acoustic Guitars


Acoustic guitars are one of the most dynamic and expressive instruments used in modern music. They have a broad frequency range covering almost the entire audible spectrum. The instrument can serve many different roles in an arrangement as a harmonic, melodic, or percussive element. All of these factors will affect how you approach both the recording and mixing acoustic guitars.

Context
The first thing to do is think about its role in the song/mix. Is the guitar the main harmonic instrument? Is it supposed to enhance or thicken other harmonic instruments like electric guitars? Is it enhancing the melody, playing arpeggios or single notes? Is it a percussive element more like a shaker just to fill out the rhythm section? Figure out the goal, then you can begin processing.

Tone control
Depending on the guitar, microphone, pick, player and role in the arrangement, acoustic guitars always require at least a little equalization to fit in a mix. Cutting of nonmusical sub frequencies (everything below 100Hz) is a must. A low shelf may be required to tame the remaining low-end. In the midrange, take out any unflattering frequencies causing 'boxiness' or anything that might mask the vocals. A broad, gentle high shelf boost can enhance articulation and an overall more sparkly sound. The general strategy is to remove what you don't need, then enhance what you do.

Dynamics
An acoustic guitar performance is often extremely dynamic, which is often a problem. A compressor will even out the differences between loud and soft notes and help keep the level more constant throughout the track. It's easy to take it too far, so keep the gain reduction to no more than 3-4dB. The compressor's attack control will allow you to clamp down on the beginning of the notes, or when set slower (about 20-50ms) will enhance the transient which helps it stand out more in the mix.

At this point you may want to adjust the sound envelope further though use of a transient shaper. This tool can increase or decrease pick attack, and separately adjust sustain.

Depth
Sending your acoustic track(s) into a stereo reverb will add space and distance to the sound. The trick here is to not wash out the sound in a ton of reverb, but just to move the move the mics back a bit into an imaginary room. Usually, a short room type verb with the highs rolled off is the best bet. Try to make the reverb sound like an office or large bedroom - short decay with and a bit of early reflections. The predelay control will separate your source from the room.


Summary
And so, following the above strategy you should now have an acoustic guitar track with a balanced frequency response, even dynamics and sense of space around the instrument, (if that was what the track required). The track is ready to be put in the mix with the other instruments. Tweak the EQ in context with the other tracks, adjust the reverb send amount, and even EQ the reverb if needed.

Examples
Acoustic Raw
Acoustic Processed

6.17.2012

Re-amping Explained

Re-Amping is a technique used by recording and mixing engineers to process recorded audio with analog hardware specifically guitar equipment.
In our direct box basics article we explained the use of a direct box in the studio, a re-amp box is used to take that clean direct guitar or bass signal and run it into a guitar amp if needed later on in the production process.
See all DI and Re-Amp boxes at Revolution Audio

What does a re-amp box do?
It is often said that a re-amp box is just passive DI box in reverse, which is untrue. A DI box converts a high impedance, unbalanced instrument level signal to a low impedance, balanced mic level signal. A re-amp box converts a low impedance, balanced line level signal to high impedance, unbalanced instrument level signal.

The goal of the re-amp box is to make the amplifier react in exactly the same way a live guitar would, but with a pre-recorded audio source. Without the re-amp box there will be an impedance mismatch and loss of tone. Hearing your guitar rig play itself can take some getting used to!


How to?
Once you have the clean DI recorded, set the track's output to analog out 3 of your interface (you will need an interface with more than just monitor outputs). No other tracks should be set to this output.  Connect output 3 of the interface to the Re-Amp box with a TRS to XLR-M cable. Connect the Re-Amp to your pedals or amplifier with a standard instrument cable. Check that you are getting a good signal to the amplifier, adjust the output level to match a live guitar input.
If the signal is noisy, try the ground lift switch.
Record the amplifier as normal with one or more microphones.
Double check your routing to prevent feedback.


Why Re-amp?
The decision to re-amp could be for a number of reasons:
  • Convenience - You may like to write and record guitar parts at 3 AM but your neighbours don't just don't understand. Record with an amp simulator silently and re-amp through your big rig later.
  • Budget - There are many professionals with big amp collections offering a Re-amping services for much less than the cost of even renting the amp of your dreams.
  • Experimentation - After you've got the perfect take captured you can experiment with different amp, cab, mic and positions as much as you like.
  • Plan B - All too often we are rushed in the studio, it's easy to make a mistake with mic position or perhaps just a bit too much overdrive than we'd like. If the performance is fine we just have to tweak the amp.
For best results
While there are many fancy direct boxes, if you are planning on re-amping you will likely find the best results are achieved through the simplest direct capture. A Tube DI or Tube preamp may be too colored and change the sound of your amp. Warming up the sound of the mic on the amp, rather than the DI is the better option. Feel free to experiment of course.

Usually the signal you send to the amplifier will be completely unprocessed, however you may wish to experiment with gating, light compression, and EQ.

Much like the way your guitar volume affects the character of the amp, sending the right level out of your DAW can be critical.

Options
The Canadian company Radial Engineering offers several Re-Amp devices for home and professional studios:
Radial REAMP JCR $199.99
Radial X-Amp Active Re-Amp $199.99
Radial ProRMP $119.99
Radial Re-Amping Kit (includes X-Amp and J48 active DI)

4.16.2012

Direct Box Basics


What is a DI box?
A DI box aka Direct Inject or Direct box is a tool we use in the studio to bring a signal from an instrument (guitar, bass, keyboards) directly into our recording system.

An audio engineer (or home recording enthusiast) will use the DI box for silent recording, as a backup or to process along with a microphone on an amplifier.

Connections
The DI box typically has 3 input and output connections.
  1. 1/4" TS instrument input - electric guitar or bass connects here
  2. XLR-M balanced output - connects to mic preamp
  3. 1/4" TS Thru - Continues the input path to connect to an amplifier.

For example, the DI box would be connected between an electric bass and audio interface mic input. The clean bass signal can be recorded without the need for an amp.

Functions
The DI box has a few functions.
  1. Impedance change - The instrument circuit will react correctly as if it was connected to an amp, and the mic preamp on the other side of the box will react as if a mic was connected.
    Without this the tone would be wimpy.
  2. Level change - An electric guitar outputs a signal that is relatively low level but significantly higher than the average microphone. The DI box steps the signal down from instrument to mic level.
  3. Unbalanced to balanced connection - Changing the unbalanced guitar signal to balanced mic level allows much longer cable lengths without signal loss or noise.
  4. Pass through - The instrument signal is split and can be continued to an amplifier.
The Hi-Z/instrument input on your audio interface preamps do most of these functions well but a high quality DI box tends to work a bit better and allows you to split the signal to continue to pedals and amplifier.

DI Box options
There are a wide variety of DI boxes on the market today in passive, active, multi-channel, and vacuum tube designs. You can browse our DI box category here: DI Boxes & Re-amps.

A passive DI is just a transformer with a few jacks connected, it doesn't require any power. The Radial JDI is a very popular professional Passive DI Box.

An active DI is a more complex design that requires phantom power (supplied by the mic preamp).
The Radial J48 is a very popular professional Active DI Box.
Different designs, same price. Both proven professional tools used in studios worldwide.

Generally speaking, they both do the same job well. In specific uses or if you are looking for less transparency, one may type may be better than other.

There are also many designed specifically for bass recording with tone controls and overdrive or amp simulation circuitry.
The Radial Bassbone is an exceptional Bass DI/Preamp.

4.03.2012

Double Tracking Guitars

Double-neck guitar optional
Double tracking is a very common recording/production technique for almost any genre of music. When it comes to rhythm guitars, this technique is almost a standard method of recording with single tracking used only for solos.

This is also a technique that is often confusing for beginners.Double tracking simply means recording the same part twice and panning each to opposite sides. This creates a wide stereo spread based on the unique nuances in timing and dynamics of each performance. This is the guitarist playing a section of the song perfectly, then repeating it as closely as possible on a second track.

This isn't the same as recording in stereo, using two mics, using a chorus effect or duplicating and delaying one side. Some of these techniques are ways of 'faking' or 'automatic' double tracking, but are simply no substitute for an expertly performed double track. There must be two separate performances for the effect to work.

How To double track guitars
1 - record mono rhythm guitar, with either a microphone on a real amp or virtual amp. This track would be panned center.
2 - when a good take is achieved, and any punch ins are finished, go through the recorded track and tighten up any timing issues.
Here's how it sounds with the first guitar along with drums. The guitar is in the middle.
[mono guitar] (warning heavy metal!)
3 - after editing, pan this guitar (and any extra mics for this performance) to the left.
4 - That was perfect, now play it again! Make a new track and pan it right.
5 - repeat steps 1 and 2 using the same guitar, pickup selection, amp, microphone and any other variables unchanged. Making a change will increase the stereo width but will often result in an unbalanced tone.
Here's the same part with the doubled guitars.
[doubled guitar]

This repeats for each section of the song and if there are multiple guitar parts written or two guitarists in the band, usually each will be double tracked. If there are two guitarists in the band, there could be some confusion. Guitarist 1 plays all his parts twice, guitarist 2 plays all his parts twice. In a simple song this would mean 4 tracks for the rhythm guitars. Often this gets up to 12 or 16 tracks pretty quickly. Guitar solos are usually right up the middle or 'stereoized' with other techniques to make them pop out.

You have to be careful playing the doubled part, if it's too far off from the original it will make a unwanted ping-ponging effect especially in headphones.
Quad Tracking is exactly the same, but you record each part 4 times. Each take has to be perfectly in sync or it just sounds like a terrible mess.

Poor alternatives
So why can't we just duplicate and delay/shift the recording a little for the same effect? Well, simply because it sounds like crap and I'll show you.
[delay]
This is what happens when you copy the original mono recording, delay the copy by 20ms and pan each hard left and right.

Similarly, why not use a stereo chorus?
[chorus]
Still sounds really bad compared to double tracking. I'm not saying don't ever use Chorus, just don't use as an alternative to the big wide powerful double-track sound.

1.02.2012

Distortion Explained Part 2

Distortion Explained Part 2
Part 2 of this article covers the differences between various types of guitar distortions - Overdrives, Fuzz, hi-gain and more. Part 1 is here.


Distortion Pedals

Overdrive/Crunch

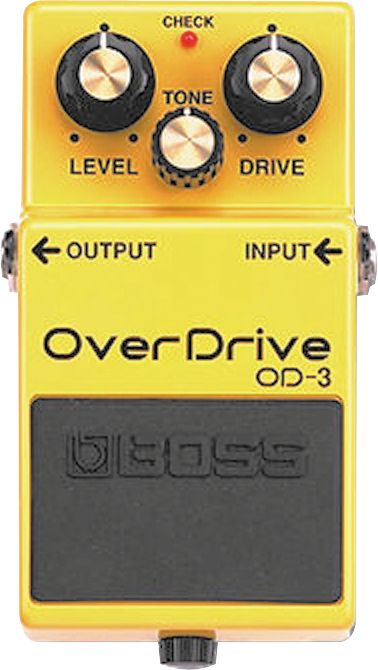
boss_od-3Some distortion effects provide an “overdrive” effect. Either by using a vacuum tube, or by using simulated tube modeling techniques, the top of the wave form is compressed, giving a smoother distorted signal than regular distortion effects. When an overdrive effect is used at a high setting, the sound’s waveform can become clipped, which imparts a gritty or “dirty” tone, which sounds like a tube amplifier “driven” to its limit. Used in conjunction with an amplifier, especially a tube amplifier, driven to the point of mild tonal breakup short of what would be generally considered distortion or overdrive, or along with another, stronger overdrive or distortion pedal, these can produce extremely thick distortion. Today there is a huge variety of overdrive pedals including the Boss OD-3 Overdrive.

Overdrive Distortion

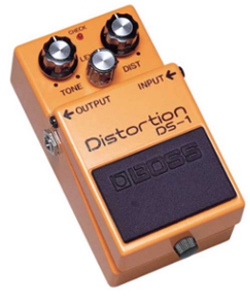
boss-distortion-pedal-ds-1Overdrive distortion is a well-known distortion. While the general purpose is to emulate classic “warm-tube” sounds, distortion pedals can be distinguished from overdrive pedals in that the intent is to provide players with instant access to the sound of a high-gain Marshall amplifier such as the JCM800 pushed past the point of tonal breakup and into the range of tonal distortion known to electric guitarists as “saturated gain.” Some guitarists will use these pedals along with an already distorted amp or along with a milder overdrive effect to produce radically high-gain sounds. Although most distortion devices use solid-state circuitry, some “tube distortion” pedals are designed with preamplifier vacuum tubes. In some cases, tube distortion pedals use power tubes or a preamp tube used as a power tube driving a built-in “dummy load.”
The Boss DS-1 Distortion is a solid state overdrive distortion pedal.

Fuzz

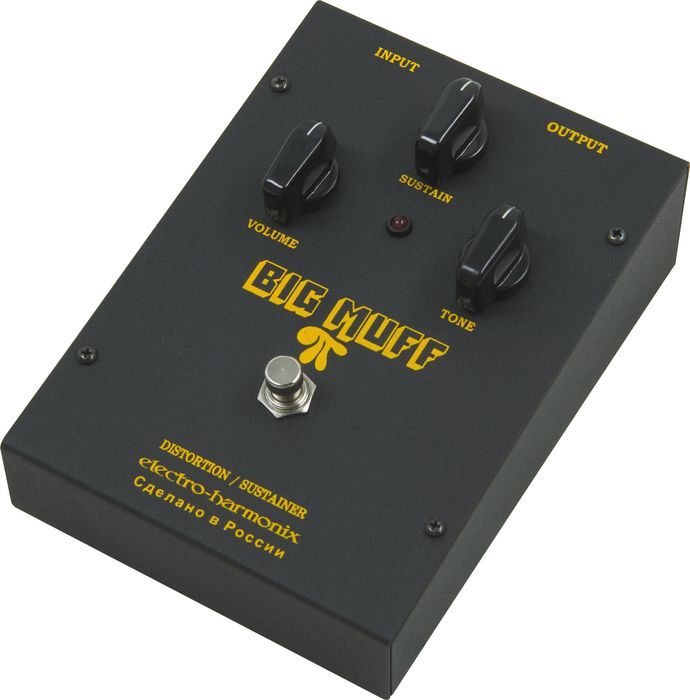
ehbigmuffrussiaFuzz was originally intended to recreate the classic 1960’s tone of an overdriven tube amp combined with torn speaker cones. Oldschool guitar players would use a screwdriver to poke several holes through the the guitar amp speaker to achieve a similar sound. Since the original designs, more extreme fuzz pedals have been designed and produced, incorporating octave-up effects, oscillation, gating, and greater amounts of distortion. The Electro-Harmonix Big Muff is a classic fuzz pedal.

Hi-Gain

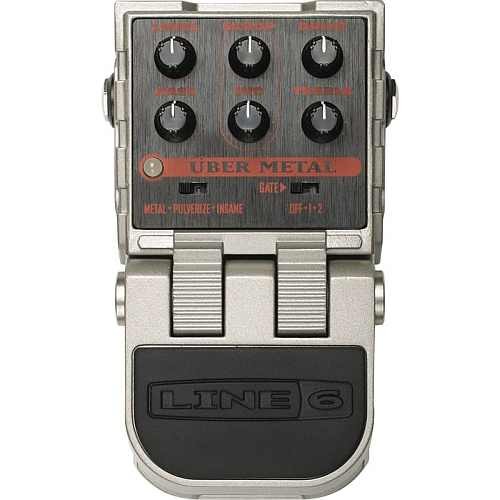
line6_ubermetalHi-Gain is the sound most used in Heavy metal. High gain in normal electric guitar playing simply references a thick sound produced by heavily overdriven amplifier tubes, a distortion pedal, or some combination of both–the essential component is the typically loud, thick, harmonically rich, and sustaining quality of the tone. However, the Hi-Gain sound of modern pedals is somewhat distinct from, although descended from, this sound. The distortion often produces sounds not possible any other way. Many extreme distortions are either hi-gain or the descendants of such.
An example of a hi-gain pedal is the Line 6 Uber Metal

Power-tube pedal

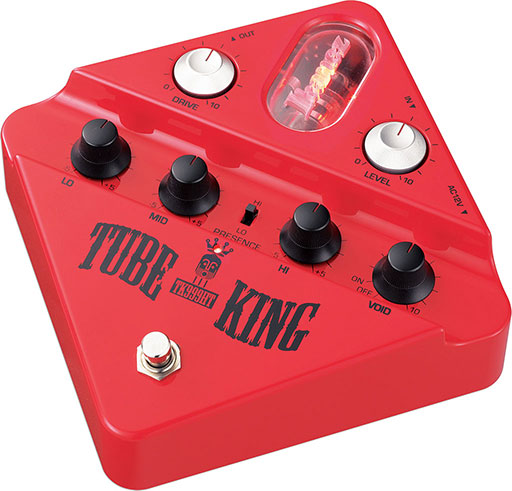
Ibanez-Tube-KingPower tube distortion is a unique kind of saturation when tube amps output stages are overdriven, unfortunately this kind of really powerful distortion only happens at high volumes. A Power-Tube pedal contains a power tube and optional dummy load, or a preamp tube used as a power tube. This allows the device to produce power-tube distortion independently of volume.
An example of a tube based distortion pedal is the Ibanez Tube King
 

Another way to distort

Digital Wave Shaping

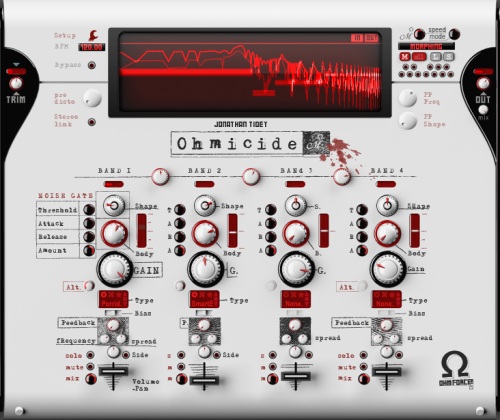
ohmicideThe word clipping in recording is usually a bad thing. And generally it is, unless we’re trying to distort something on purpose. In the digital world we can use powerful wave shaping tools to drastically distort and manipulate a sound. Rather than subject you to the technical explanation of how it works, just listen to Nine Inch Nails, they use this a lot. It’s perfect for really harsh, aggressive, unnatural and broken sounds. The Ohmforce Ohmicide plugin is an example of this style.

Why Is This Important?

Alright, so why did I just explain those different types of distortion sounds? Because knowing those sounds can help you be a better musician, engineer and producer. It will help you make decisions on what gear to purchase and what is appropriate for a song.

What Else?

Besides guitar what else is distortion good for? Well, pretty much anything, as long as it’s appropriate for the song.
  • Slight distortion can make something sound more exciting, too much can sometimes make it really tiny sounding.
  • When recording electric guitars, you can get a way bigger sound by using less gain and recording the same part multiple times, double or quad-tracking.
  • Distortion can sound really cool on drums, but you may have to heavily gate the drums, the sustain can get out of control.

12.26.2011

Featured Equipment Of The Week: Radial Bones Guitar Effects Pedals

Bones™ - Built for players that LOVE great tone! Bone's represent the evolution of the solid state pedal with low-noise 'Tonebone' circuits, pop free electronic switching and tough 14-guage steel construction.


There are 5 pedals in the Bones line: London Distortion; Hollywood Distortion; Vienna Chorus; Texas Overdrive; Twin City ABY switcher.

Check out the Radial Bones pedals and more at Revolution Audio

Hollywood Dual Distortion
  • Variable drive gain distortion
  • Modeled after 'American' tube amps
  • Dual mode for clean, rhythm & lead
London Dual Distortion
  • Multi-stage high gain distortion
  • Modeled after 'British Plexi' half stack
  • Dual mode for clean, rhythm & lead
Texas Dual Overdrive
  • Variable overdrive and tone
  • Vintage to extreme overdrive range
  • Dual mode for clean, rhythm & lead
Vienna Chorus
  • Old school analog bucket brigade chip
  • Dual channel for quick choral changes
  • Individual Rate and Depth for each chorus channel
Twin City ABY Switcher
  • Buffered ABY with Drag™ load correction
  • Isolated output eliminates hum and buzz
  • 180º polarity sets both amps in phase

Check out the Radial Bones pedals and more at Revolution Audio

10.03.2011

Featured Equipment Of The Week: Radial Re-Amping Kit

 Radial Re-Amping Kit
Re-amping kit contains J48 and X-Amp in rugged case. PSU included
Find out more | Radial Re-Amping Kit


Radial J48
The Radial J48 is a great sounding active direct box that has been optimized to produce maximum headroom while working within the limited current available from standard 48V phantom power. By employing a unique switching power supply, the J48 is capable of peak transients to 9 volts without choking. The result is lower harmonic distortion, half the inter-modulation distortion and significantly improved dynamics over other DIs.

Features include a -15dB pad, 180º polarity reverse, a unique merge function to mix two signals to mono, an 80Hz high-pass rumble filter, and ground lift. Like all Radial products, the J48 is built to handle the abuse on the road and features a unique welded I-beam construction for years of trouble free performance.

Radial X-Amp
The Radial X-Amp is an active re-amping device that presents the engineer / producer with a new and innovative creative tool that allows a pre-recorded track from a line level device to drive two guitar amplifiers or effect pedals simultaneously. This opens the door to explore new musical sounds and spur on the creative process.

Features include balanced line level input with LED peak indicator and level control, Class-A circuit topology for optimal reach and frequency response, direct and isolated guitar amplifier outputs, 180º polarity reverse to bring both amps into phase, and dual ground lift options for noise-free operation.

Buy Radial Re-Amping Kit at Revolution Audio

9.05.2011

Featured Equipment Of The Week: Radial ProRMP passive reamp

Radial ProRMP
Re-amping has been the 'secret weapon' for countless recordings by the biggest names in the business and the process is often used on guitars, bass, keyboards, percussion and even voice to create new textures! The Radial ProRMP is a 100% passive re-amplifier that lets you to take a pre-recorded track and re-amplify it through a guitar amp or effects pedals to create new and exciting tones.
Plug and play easy to use, the ProRMP connects from the recorder to your amp and effects units and does all the impedance matching for you. Just adjust the level to suit!

Find out more | Radial ProRMP


TOP FEATURES


  • Play prerecorded tracks through amps and pedals
  • Opens the door to creative new tones and textures
  • Eliminates repetitive playing during recording
  • On board level control for fine tuning the gain
  • Transformer isolated to eliminate buzz and hum

    See all the details and buy Radial ProRMP at Revolution Audio
  • 7.16.2011

    DOs and DON'Ts of Acoustic Guitar Recording

    DO keep your strings fresh (and keep the ends cut short)
    DO wash your hands before and after playing
    DO listen to the instrument to find the best mic placement
    DO wear closed-back headphones to avoid escaping noise
    DO find the spot in the room where the guitar sounds best
    DO try to breath quietly through your nose (yes this is a problem sometimes!)
    DO try to stay in the same position in front of the mics
    DO try different thicknesses of picks for different sounds

    DON'T forget to tune often
    DON'T place your mics close to the sound hole
    DON'T stop if you make a mistake
    DON'T assume the built-in pickup actually sounds anything like your guitar, not to say it can't be useful at times
    DON'T forget to empty your pockets of keys, change and cellphone
    DON'T rush through the recording, take your time now to get it right.

    7.01.2011

    6 Tips for Great Electric Guitars Without Amps

    With direct guitar recording into virtual amps you can now rock out through the guitar chain of your dreams in the comfort of your home studio and without the neighbors calling the cops.
    In this article I've outlined a few tips and best practices for getting great guitar tones without amps or mics.

    1. Go Direct - 'going direct' means connecting your guitar into your recording interface by means of the high impedance (HI-Z) instrument input if available or through a DI box (Direct injection box). A direct box converts the hi-impedance signal from the guitar to low-impedance, mic level signal to connect to any preamp. Great results can be had with either though the best results come from the best signal chain including quality cables and DI box. The Radial JDI and J48 are professional studio standards and are actually quite affordable.
    2. Avoid hum and buzz - LCD and LED monitors (computer screens) are now the norm and while they don't emit as much noise as CRT  monitors some noise can still be picked up by your guitar pickups. Computer fans, cell phones and even a wrist watch can be sources of unwanted noise in your guitar tone. To reduce and avoid the noise sometimes you just need to move around the room a little and the noise will be gone. Additional noise suppression is best done with a noise gate plugin in your DAW.
    3. A virtual guitar rig - The quality and quantity of virtual guitar amps has increased dramatically over the past few years to the point where you may not even want a real amp anymore. Amplitube 3, Guitar Rig 4, and POD Farm 2 (to name just a few) are all top notch virtual guitar processing systems. They've really raised the bar in sound quality. The flexibility and ability to select from hundreds of pedal, amp, cabinet and mic combinations at will makes them invaluable tone shaping tools for guitar, bass and beyond.
    4. Latency - With guitar recording, the lower the latency the better. 128 samples is good, but 64 samples or lower is ideal. Latency affects the way you play and you want the immediacy that plugging into a real amp has. You'll need a good firewire interface to achieve this kind of stable low latency.
    5. Timing and tuning - As always, timing of the performance and tuning of the instrument are so important. Most of the major virtual amp packages have a tuner option, check the tuning often! With a DAW you can actually see and hear how far off your timing is. Record each section of the song multiple times, choose the best or best bits of each performance and edit a composite that's in time and in tune.
    6. Filtering out the bad stuff - Virutal amps don't sound 100% real but they're getting closer all the time. Where the current virtual amp systems fall short is in the cabinet and microphone options. I always use an EQ after the amp plugin to get rid of the harshness and fizz that can make an amp sound fake. If you boost with a sharp Q between 3kHz and 12kHz you can usually find 2-3 really nasty areas. Isolate the frequency and cut it out by a few dB. Here's how that sounds: No EQ (mp3) | Fizz Cut (mp3)

    These are just a few tips to get you started with direct guitar recording. If you'd like to see more on this topic leave a comment below.

    3.14.2011

    5 tips for recording great Electric Guitars with amps

    5 tips for recording great Electric Guitars with amps 

    Recording guitars can either be a lot of fun, or a lot of frustration. Here are a few tips for recording electric guitars in your home studio.

    1 - Guitar and amp selection - All guitars sound different. A telecaster will never sound like a Les Paul, no amount of processing will change that. So if you need the sound of a Les Paul for this recording, your best bet is to have one available. There are some amps that do well in many recording situations but forcing your amp to sound like something it's not will just lead to frustration. Both a Fender Twin and Vox AC30 sound great for clean tones, but they are drastically different sounds. Using the same guitar and amp for every part of every song gets kinda boring, have a few options available and choose what's best in that situation.

    2- Consider the room - Don't underestimate the impact the room has on amps. Generally speaking, you want the amp well away from walls and up off the floor a little. If a small amp doesn't sound big enough, try putting it in a corner to get more bass. A carpet in front of the amp will help keep reflections from getting into the mic. 

    3- Tuning, new strings and intonation - I mentioned this in the article about Acoustic Guitars, and it is just as important for Electrics. A properly set up guitar with new strings will allow you to play optimally with every note in tune. A guitar should be set up each season as humidity and temperature can really have an impact. Check the intonation whenever you change strings.
     
    4- Mic selection and position - For electric guitar amps the two most often used mic types are dynamic and large diaphragm condenser. The dynamic mic will shape the sound somewhat and the condenser will be more true to the source, not always what you want (too much fizz?). Distance, angle and position across the speaker greatly affect what the mic picks up. Take the time to experiment and get it right, don't just put the mic where it looks like it should be or the place that worked last time, always listen. Adding a second mic is another challenge but can be very interesting.

    5- Double track - Record a double of each rhythm part. A double is the same part performed as closely as possible to the original. Every strum and chug in unison. The original is panned left, the double to the right. When recording doubled guitars you can dial the gain back a bit for each. You can leave the guitar, pickup, amp and mic selection the same, or change it up a little, not too much.

    2.27.2011

    5 Tips for a Great Acoustic Guitar Recording

    Here are 5 tips for getting great acoustic guitar recordings in your home studio.


    1 - Guitar Selection: Every brand and style of guitar has a different sound. Yamaha or Martin, a full size Dreadnaught or a smaller Parlor style. They all sound different, your favorite or most expensive guitar may not be the best for every situation. Having a few choices available will help you get a lot closer to the sound that's right for any song.

    2 - Tuning and New strings: It's very simple but often overlooked. Before an important recording session, put new strings on your guitar. Before every take make sure it's perfectly tuned. If you use a capo remember to compensate with your tuning.

    3 - Listening: Instead of just putting the mic where you think it will sound good, actually get up and walk around and listen to the tonal changes in each part of the guitar. When you find a favorite spot, put your mic there. This is a great starting point for a mono (single mic) recording as well as a good warm-up for your ears. If the song calls for a stereo acoustic guitar part, you still need to find the sweet spot for the mics. How high or low, close or far, you don't know until you take the time to listen.

    4 - Mic Choices and Position: In the studio it is unlikely you will prefer the sound of a dynamic mic on acoustic guitar compared to a condenser, but if you've never heard it, by all means try it, try all your mics. Large diaphragm condensers and small diaphragm condensers are the most common choices for acoustic guitar recording. Again, listen to the differences between mics and where you place them. The closer the mic is to the instrument the more 'Proximity Effect' (an exaggerated low frequency boost in the mic) there will be. Avoid using mics that might exaggerate lows, mids or highs in an already too dark, middy or bright guitar. Pick a mic that complements or balances the sound, dark mic on a too bright guitar for example.

    5 - Processing: After you've done your best capturing the guitar right, you still may need to do some work to get it playing nice with all the instruments. In the mix you'll usually need a bit of processing to make room for other instruments, control dynamics, among other things. Generally you need to: cut the very low frequencies, shape the mids to make room for vocals, compress a few dB to even out the performance and add a little reverb to give it space.